Memoryze Memory Forensics Tool
 Peter Silberman (peter) <peter Peter Silberman (peter) <peter openrce openrce org> org> |
Wednesday, November 26 2008 20:06.40 CST |
Introduction
The goal of this article is to demonstrate how simple malware analysis can be using Memoryze and some good old fashion common sense. Readers should have some knowledge of how malware works, and be somewhat familiar with Memoryze. A good place to familiarize yourself with Memoryze is the user guide included in the installer.
Memoryze is designed to aid in memory analysis in incident response scenarios. However, it has many useful features that can be utilized when doing malware analysis. Memoryze is special in that it does not rely on API calls. Instead Memoryze parses the operating systems' internal structures to determine for itself what the operating system and its running processes and drivers are doing.
Malware Analysis
The first step in malware analysis differs from analyst to analyst and case to case. Some common first steps are running strings, putting a binary in a disassembler like IDA Pro or doing run time analysis. Using IDA requires that the analyst has enough working knowledge to be able to reverse the binary if needed. It also requires that the binary be unpacked on disk. This article will detail how to do runtime analysis without the help of IDA.
In this case the malware sample came from Offensive Computing, the samples MD5 hash is 117aec6aae1c4d25fc5fa2b9a4f905e5. The analyst will load the malware in a XP SP2 virtual machine (VM). Once the malware is placed in the VM, execute it. The first thing to notice is almost immediately after execution the process has exited. The fact the process exited could indicate a couple of things:
- The process injected itself somewhere else
- The process installed a driver which could be hiding a process
- Malware failed to load due to problems with the environment (i.e. VM aware)
<?xml version="1.0" encoding="utf-8"?>
<script xmlns:xsi="http://www.w3.org/2001/XMLSchema-instance" xmlns:xsd="http://www.w3.org/2001/XMLSchema" chaining="implicit">
  <commands>
    <command xsi:type="ExecuteModuleCommand">
      <module name="w32processes-memory" version="1.0.34.0" />
      <config xsi:type="ParameterListModuleConfig">
        <parameters>
          <param name="pid">
            <value xsi:type="xsd:unsignedInt">4294967295</value>
          </param>
          <param name="handles">
            <value xsi:type="xsd:boolean">true</value>
          </param>
          <param name="sections">
            <value xsi:type="xsd:boolean">true</value>
          </param>
          <param name="ports">
            <value xsi:type="xsd:boolean">true</value>
          </param>
          <param name="strings">
            <value xsi:type="xsd:boolean">false</value>
          </param>
        </parameters>
      </config>
    </command>
    <command xsi:type="ExecuteModuleCommand">
      <module name="w32drivers-signature" version="1.0.34.0" />
    </command>
    <command xsi:type="ExecuteModuleCommand">
      <module name="w32kernel-rootkitdetection" version="1.0.30.0" />
       <config xsi:type="ParameterListModuleConfig">
        <parameters>
        <param name="idt">
            <value xsi:type="xsd:boolean">true</value>
        </param>
        <param name="ssdt_index">
            <value xsi:type="xsd:boolean">true</value>
        </param>
        <param name="ssdt_inline">
            <value xsi:type="xsd:boolean">true</value>
        </param>
        <param name="drivers">
            <value xsi:type="xsd:boolean">true</value>
        </param>
        </parameters>
      </config>
    </command>
  </commands>
</script>
This custom audit runs the following four jobs:
- A full process audit with ports, handles, sections, turned on for every process. Strings is turned off because too much data is generated when scanning all the running processes address spaces.
- A driver signature scan to enumerate all drivers even those hidden by unlinking the PsLoadedModuleList
- A hook detection audit that looks for common kernel hooks
Memoryze.exe -o -script AllAudits.Batch.xml -encoding none
This tells Memoryze to output it to the standard %INSTALLDIR%/Audits/%COMPUTERNAME%/%DateTime%. The next parameter indicates what script to execute and the final parameter tells Memoryze not to compress the output.
If this is malicious software there will be some trace that can be found in one of these audits. It maybe small, but it should be there. To examine the results of a big audit like AllAudits use Audit Viewer available here. Audit Viewer's user guide can be found here. Audit Viewer will render the xml generated by Memoryze in a readable more manageable way.
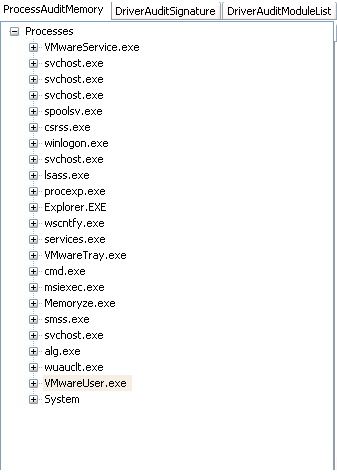
Figure 1: Processes running after infection
Figure 1, shows all the processes running after the initial infection. There are no real suspicious processes currently running. This process listing does not eliminate the fact the system can still be infected. There are still a plethora of possible infections on the system. Some possibilities are:
- the malware hijacked another processes image
- the malware injected itself into another process address space
- the malware has patched some binary to load itself
- the malware installed a driver and is now working in the kernel

Figure 2: Hooked SSDT entries
In this case the malware has installed three System Service Descriptor Table (SSDT) hooks. The analyst can determine what driver installed the hooks by looking at the Hooking Module column. The driver in this case is burito24b1-1710.sys. This is a non-standard system driver. At this point the analyst should start to consider the idea that a rootkit has infected their environment. The functions hooked by this driver are:
- NtEnumerateKey
- NtEnumerateValueKey
- NtQueryDirectoryFile
Clicking on the interrupt descriptor table (IDT) tab reveals nothing useful. Clicking on the interrupt request packet (IRP) tab reveals something else about the driver. It appears the driver is hooking the IRP_MJ_DEVICE_CONTROL function pointer in tcpip.sys. This usually indicates that the driver is hiding some network activity it or a userland process does not want seen.

Figure 3: IRP hooks
A quick note, the operating system commonly hooks itself so there will be a number of driver IRP hooks on a non infected machine.
At this point the level of suspicion should be very high and acquiring this driver for analysis later is going to be important. Acquiring a driver is essentially capturing how it looks in memory and writing that view to disk for analysis. One reason acquisition is important is because the driver is currently hidden on disk. Since the driver is hidden it can't be analyzed at the moment. Acquiring the driver from memory and writing it to disk will allow for it to be analyzed. There are two ways to do acquire the driver. If the analyst is running Audit Viewer on the live system (within the infected environment) check "Running on live memory." Then the analyst can right click on the driver in the DriverAuditSignature, DriverAuditModule, or RootkitAudit tabs and acquire it from memory. If the analyst isn't running on live memory and s/he is running from a memory image. S/he can check "Running on dead memory" and fill in the text box "Path to Image File" with the image path, and then do the right click acquire.

Figure 4: Acquring driver from memory
Figure 4 shows how to acquire the driver from the Rootkit tab view.
From just using Memoryze and viewing the results in Audit Viewer the following has been determined:
- The executable in question was malicious.
- The executable file installed a driver with what appears to be a randomly generated name.
- The driver is a rootkit that hooks three system calls and an IRP routine. With these hooks the rootkit is capable of hiding itself on disk and in the Registry as well as hiding network traffic.
This is a lot of information obtain in a very short period of time without the help of IDA. There is always the potential to go further. In this case, the question becomes what else is the driver doing or has it done? It is common for rootkits to want to have some userland presence. This is usually due to the fact that it takes less knowledge, is safer, and easier to have a userland component than do everything in the kernel (even though it is possible).
Continuing further, the analyst may want to try and see if it's possible to identify a userland component. Any userland component would have to be injected into another process since a quick, top level examination of processes did not reveal anything.
Further Analaysis
Analysts can use a number of methods to determine what process has been compromised. This article will discuss two. The first is to look at a complete listing of all open ports on the system. The reason the analyst is going to want to look at ports is that the tcpip.sys hook indicates that the driver is trying to hide some network activity. Identifying the process that has suspicious ports open, may quickly identify which process has been compromised. To get the complete listing of all ports double click on the process tree root. Double clicking on the process tree root will also give the analyst a complete listing of all files, mutants, processes, registry keys, event handles, as well as DLLs, and strings. This will take all the process handles and sort them by least frequency of occurrence. This means, for example, the file handles that occur least frequently across all processes are at the top of the list and file handles that occur frequently across all processes (and are less likely to be malicious) are at the bottom of the list. This makes it so the analyst doesn't have to sift through all the results and can focus only on files or other handles that have a low occurrence across all processes. See Figure 5.
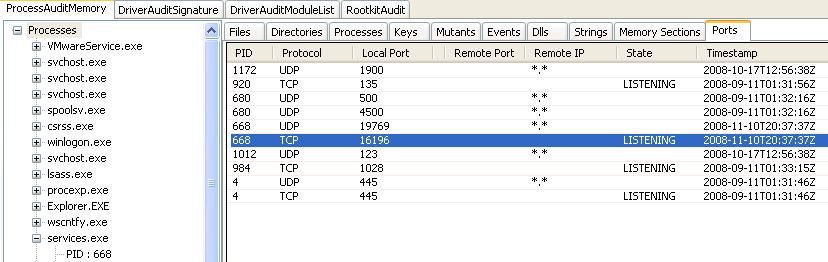
Figure 5: Port listing of all processes
In this case all the ports are listed for all processes. Since Memoryze identifies listening ports in memory and does not rely on API calls the tcpip.sys hook the rootkit install is useless. The analyst will see two suspicious ports 19769 and 16196.
The fact that services.exe is listening on a non default windows port is one indication the process might have been compromised. Running tcpview on the machine will reveal that port 16196 is hidden. This indicates that services.exe was the process that was injected. The next step from here would be to acquire the process, examine its memory sections, and identify injected DLLs.
The second method for identifying compromised processes has two parts. The first part of this method is to use a feature built into the Audit Viewer. When the analyst right clicks on the root of the process tree they will get an option "Scan process for executable memory" this operation will scan all the processes for sections marked EXECUTE_READWRITE. The EXECUTE_READWRITE memory section permission, is something Jamie Butler spoke about at Hack In The Box Dubai (slides). This specific permission is commonly related to maliciously injected code - either shellcode or inject dlls/threads. When the analyst scans the processes, they get a report back that four processes out of twenty-three processes have the potential indicator that the process has been injected.
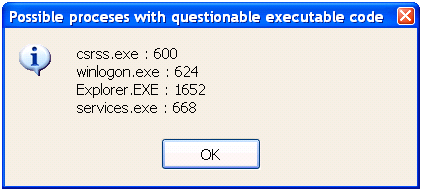
Figure 6: Result of scan for executable code
The second part of the approach will tell the analyst if any of these processes actually has an injected DLL in memory. Use the process acquisition techniques discussed by Peter Silberman at Hack In the Box Kuala Lumpur (slides). First acquire all four processes in question. Acquisition is easy to do if the analyst is running Audit Viewer on the infected machine. If the analyst isn't running Audit Viewer on the live machine they can acquire an image of the machine and give Audit Viewer the path to the image. Once Audit Viewer is setup right click on each process in the tree view and acquire the process. Once the processes have been acquired (the author recommends renaming the directories to something that indicates what it contains) run find_injected_dll.py on each acquired process.
Output from running find_injected_dll.py script:
find_injected_dll.py acquired_explorer_exe/
Found 0 injected dll(s)

find_injected_dll.py acquired_csrss_exe/
Found 0 injected dll(s)

find_injected_dll.py acquired_winlogon_exe/
Found 0 injected dll(s)

find_injected_dll.py acquired_services_exe/
Found injected dll C%3a%5cWINDOWS%5csystem32%5c668_0x00040000-0x00060fff.VAD
Found 1 injected dll(s)
From the output of the find_injected_dll, there is just one injected DLL and that is in services.exe.
Both methods help to determine if and what process might have been compromised. The first method did not definitively tell the analyst where in memory the injected DLL was. If the analyst were to combine the first method to identify the process, then acquire the processes memory and run find_injected_dll.py the results would be the same as running find_injected_dll.py on all questionable processes.
Identifying Compromised Machines
Part of malware analysis is to develop some kind of way to identify infected machines. This identification should be based on the malware's behavior. The analyst can use Memoryze to identify infected machines by filtering a given process or drivers behavior. The filter could be return all processes that have a file handle open to "spamlist.txt". Or return any driver that hooks function's "X and Y." Filters can be simpler, if some malware creates a unique process or driver name that can be filtered on as well.
Creating filters for malware using Memoryze is relatively easy to do. Memoryze has the ability to apply xpath filters to its results. In this case, the rootkit has a few behaviors that can be made into a filter.
- The malicious driver has a unique driver object \Driver\Buritio*
- The malicious driver has unique behavior in the hooks it installed
<?xml version="1.0" encoding="utf-8"?>
<script xmlns:xsi="http://www.w3.org/2001/XMLSchema-instance" xmlns:xsd="http://www.w3.org/2001/XMLSchema" chaining="implicit">
  <commands>
    <command xsi:type="ExecuteModuleCommand">
      <module name="w32drivers-signature" version="1.0.34.0" />
      <filters>
        <filter>
          <module name="xpath" />
          <config xsi:type="ParameterListModuleConfig">
            <parameters>
              <param name="expression">
                <value xsi:type="xsd:string">//*[(matches(lower-case(DriverName), 'burito.*'))]
              </param>
            </parameters>
          </config>
        </filter>
      </filters>
    </command>
  </commands>
</script>
The second filter will identify any malware with the following behavior:- Driver has a hook installed and its name matches burito.*sys.
- The hooking driver is hooking tcpip.sys and specifically is hooking the IRP_MJ_DEVICE_CONTROL function.
<?xml version="1.0" encoding="utf-8"?>
<script xmlns:xsi="http://www.w3.org/2001/XMLSchema-instance" xmlns:xsd="http://www.w3.org/2001/XMLSchema" chaining="implicit">
  <commands>
    <command xsi:type="ExecuteModuleCommand">
      <module name="w32kernel-rootkitdetection" version="1.0.30.0" />
      <config xsi:type="ParameterListModuleConfig">
        <parameters>
   	<param name="drivers">
            <value xsi:type="xsd:boolean">true</value>
        </param>
        </parameters>
       </config>
      <filters>
        <filter>
          <module name="xpath" />
          <config xsi:type="ParameterListModuleConfig">
            <parameters>
              <param name="expression">
                    <value xsi:type="xsd:string">//*[(matches(lower-case(HookingModule), 'burito.*sys') and contains(lower-case(HookedFunction), 'irp_mj_device_control') and contains(lower-case(HookedModule), 'tcpip.sys'))]</value>
              </param>
            </parameters>
          </config>
        </filter>
      </filters>
    </command>
  </commands>
</script>
Conclusion
Hardcore malware analysis will probably always involve some insight from a disassembler like IDA. However the insight required can be lessened with good runtime/post runtime analysis tools like Memoryze. Using Memoryze, some common sense combined with the AuditViewer. It should be clear how this combination can help to solve the basic quick malware analysis problem.
This is the first post in a series of articles that will be put up on http://blog.mandiant.com, dealing with a wide variety of topics from malware analysis and reverse engineering to disk and memory forensics.
All the tools mentioned in the article can be found at the following locations:
- Memoryze - http://www.mandiant.com/software/memoryze.htm
- Audit Viewer - http://blog.mandiant.com/wp-content/uploads/2008/11/auditviewer.zip
- find_injected_dll.py - here